The OpenShift Tooling allows users to create, import, and modify OpenShift applications as follows:
Create a New OpenShift Connection
To be able to use the OpenShift tooling in the IDE, you must first create an OpenShift connection. To create a new OpenShift connection:
-
In the
OpenShift Explorerview, clickNew Connection Wizard. In case theOpenShift Explorerview is not available, clickWindow>Show View>Otherand then in theShow Viewwindow search forOpenShift Explorerand clickOKafter you find it. -
In the
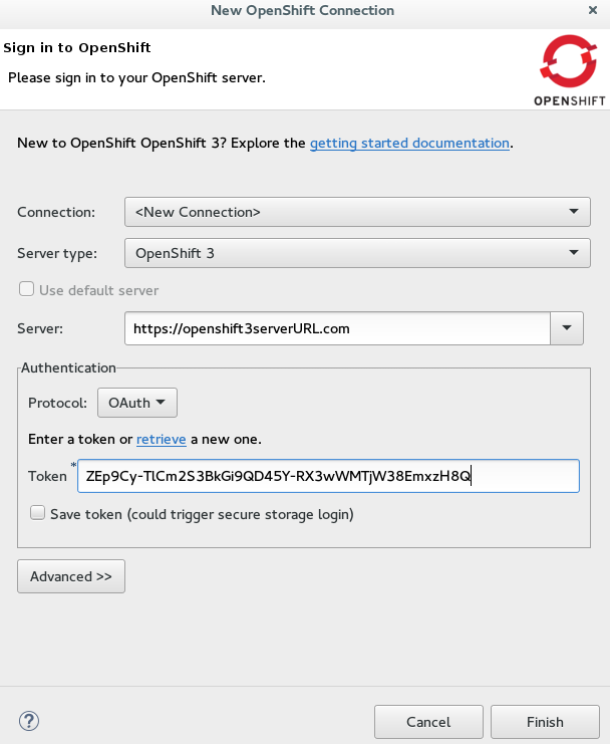
New OpenShift Connectionwizard:-
In the
Connectionlist, click<New Connection>. -
In the
Serverfield, type the URL for an OpenShift server. -
In the
Authenticationsection, in theProtocollist, clickOAuthto authenticate using the token or clickBasicto authenticate using login credentials.
-
-
Click
Finish.

Result: The connection is listed in the OpenShift Explorer view.
Create a New OpenShift Project
To create a new OpenShift project:
-
In the
OpenShift Explorerview, right-click the connection and clickNew>Project. -
In the
Create OpenShift Projectwindow:-
In the
Project Namefield, type a name for the project. Project names must be alphanumeric and can contain the character “-” but must not begin or end with this character. -
In the
Display Namefield, type a display name for the project. This name is used as the display name for your project in theOpenShift Explorerview and on the OpenShift web console after the project is created. -
In the
Descriptionfield, type a description of the project.
-
-
Click
Finish.
Result: The project is listed in the OpenShift Explorer view, under the relevant connection.
Create a New OpenShift Application
Use the New OpenShift Application wizard to create OpenShift applications from default or custom templates. Using a template to create an application is useful because the same template can be used to create multiple similar applications with different or identical configurations for each of them.
|
To learn more about using and creating templates with OpenShift, see Using Templates with OpenShift. |
-
In the
OpenShift Explorerview, right-click the connection and clickNew>Application. -
If required, in the
New OpenShift Applicationwizard, sign into your OpenShift server using theBasicprotocol (username and password) or theOAuthprotocol (token) and clickNext. -
In the
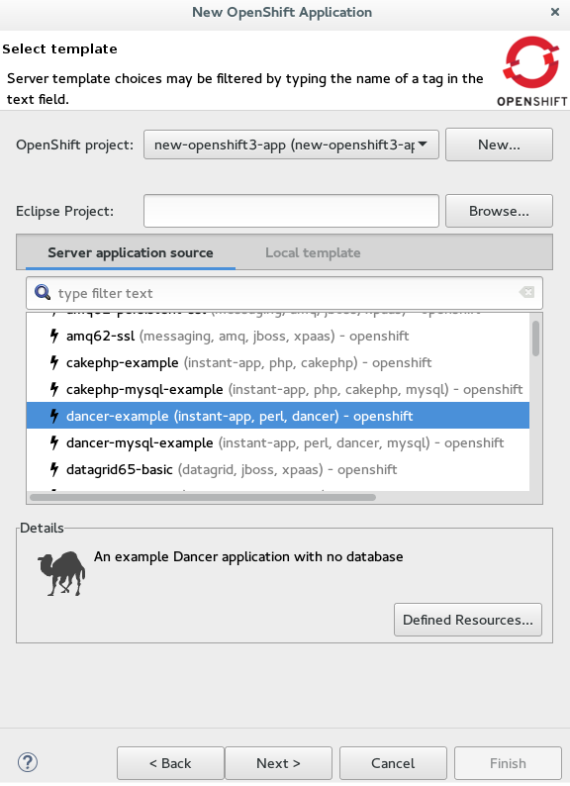
Select Templatewindow, click theServer application sourcetab.To create an application from the a local template, click the
Local templatetab and then clickBrowse File SystemorBrowse Workspaceto locate the template that you want to base the project on. -
From the list, click the template that you want to base your project on. You can also use the
type filter textfield to search for specific templates. -
Click
Next. Figure 2. Select a Template for Project Creation
 -
In the
Template Parameterswindow, confirm the parameter values and clickNext. -
In the
Resource Labelswindow, confirm the labels that you want to add to each resource. You can also clickAddorEditto add labels or edit the existing ones. -
Click
Finish. -
In the
Results of creating the resources from the [template_name]window, review the details and clickOK. -
In the
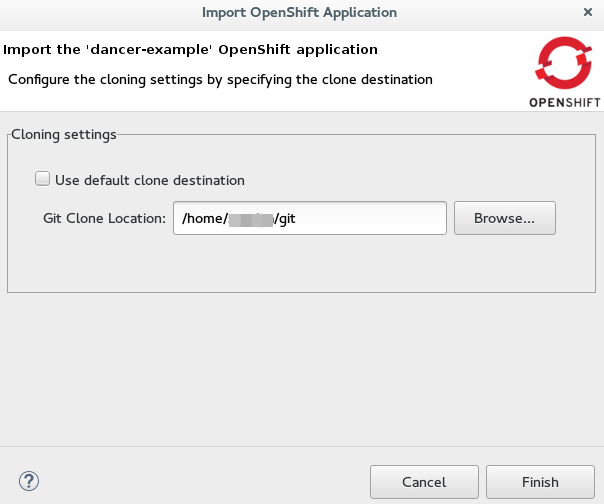
Import Applicationwindow, clickUse default clone destinationto clone the application at the default location or in theGit Clone Locationfield, type or browse for the location where you want to clone the application and clickFinish. Figure 3. Select a Git Clone Location
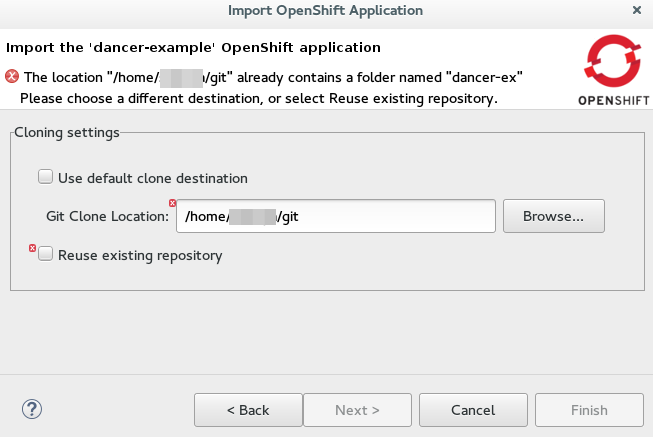
If the Git location chosen to clone the application already contains a folder with the application name that you are trying to import, you must select a new location for the Git clone. In case you do not select a new location, the existing repository will be reused with the changes you made being retained but not reflected on the OpenShift console.
 Figure 4. Git Clone Location Reuse
Result: The application appears in the Project Explorer view.
Import an Existing OpenShift Application into the IDE
|
Only an application that has its source specified in the |
Applications associated with your OpenShift account(s) are listed in the OpenShift Explorer view. The source code for these applications can be individually imported into the IDE using the OpenShift tools Import OpenShift Application wizard. Once imported, the user can easily modify the application source code, as required, build the application and view it in a web browser.
To import an existing OpenShift application as a new project in the existing IDE workspace:
-
If required, sign into your OpenShift server using the
Basicprotocol or theOAuthprotocol. -
In the
OpenShift Explorerview, expand the connection to locate the application to import. -
Right-click {project name} and click
Import Application.To import a particular application from a service, right-click the service and then click
Import Application. If you right-click a project and clickImport Application, and if there are more than one build configs with source code under a project, you will be prompted to select the desired application for import because of existence of several applications under one project. -
In the
Import OpenShift Applicationwizard,Existing Build Configslist, click the application that you want to import and clickNext. -
Ensure the location in the
Git Clone Destinationfield corresponds to where you want to make a local copy of the OpenShift application Git repository and clickFinish.
Result: The application is listed in the Project Explorer view.
Deploy an Application Using the Server Adapte
The server adapter allows incremental deployment of applications directly into the deployed pods on OpenShift.
To deploy an application:
-
In the
OpenShift Explorerview, expand the connection, the project, and then the application. -
Right-click the {application_name} and click
Server Adapter. In theServer Settingswindow,Servicessection, select the service.A workspace project will be selected automatically, if the OpenShift service has a Build Config with a git URL matching the git remote URL of one of the workspace projects.
-
Click
Finish.
Result: The Servers view is the view in focus with the server showing [Started, Publishing…] followed by the Console view showing the progress of application publishing.

View an Existing Application in a Web Browser
To view an application in the internal web browser, after it has been successfully deployed, in the OpenShift Explorer view, right-click the application, and click Show In > Web browser.
Result: The application displays in the built-in web browser.
Delete an OpenShift Project
You may choose to delete a project from the workspace to make a fresh start in project development or after you have concluded development in a project. All resources associated with a project get deleted when the project is deleted.
To delete an OpenShift project:
-
In the
OpenShift Explorerview, expand the connection and then the project to locate the application you want to delete. -
Right-click {project name} and click
Delete Project. -
In the
OpenShift resource deletionwindow, clickOK.
|
To delete more than one project (and the containing applications), in the |
Did You Know
-
Scale the project deployment, using the context menu for the service (the first node below the project). You can also scale the deployment from the
Propertiestab of a deployment (replication controller) and deploymentconfig. -
View the rsync output in the
Consoleview. You can also see the progress of the file transfer after you publish local changes to OpenShift.